Cell culture
Cell culture kdorfman Mon, 07/09/2012 - 19:38Tissue Culture Facility
Tissue Culture Facility margaret Thu, 10/27/2011 - 20:27Hoods When beginning work in a hood, spray all walls and the working surface with 70% ethanol and wipe clean.
When you have finished working in a hood: please leave it empty, spray the walls and working surface with 70% ethanol and wipe, and make sure that the gas is off. Leave the fan on and turn on the UV light.
Incubators Immediately remove any contaminated dish or flask from the incubator and treat itwith 30% bleach. Wipe the shelf it was on with 70% ethanol. Notify any individuals with cells in the incubator of the contamination.
If you are using an incubator that requires CO2: Always check the water level in the bottom of the incubator, if level is low add water. You are responsible for checking the level of CO2 in the tanks, if pressure falls below 800 psi the tank is emptying. After having received instructions, connect a full tank to the incubator and order a replacement (or notify someone).
Microscopes Please make sure the microscopes are clean and covered when not in use.
Pipets Dispose of all glass Pasteur pipets in the glass only bin. Disposable plastic pipets should be placed in trash (in the plastic sleeve). Reusable pipets should be placed tip up in the pipet jar.
Supplies Label all items in the refrigerator with your name and date. Items that not labeled will be discarded.
Vacuum Pump When you are done, please empty and rinse flask with 30% bleach.
Other Keep the area clean at all times. Dishes and flasks of cells to be discarded should be treated with 30% bleach before trashing.
Bulk coverslip staining
Bulk coverslip staining kdorfman Wed, 09/08/2021 - 20:03Grow cells on coverslips in 6-well plates
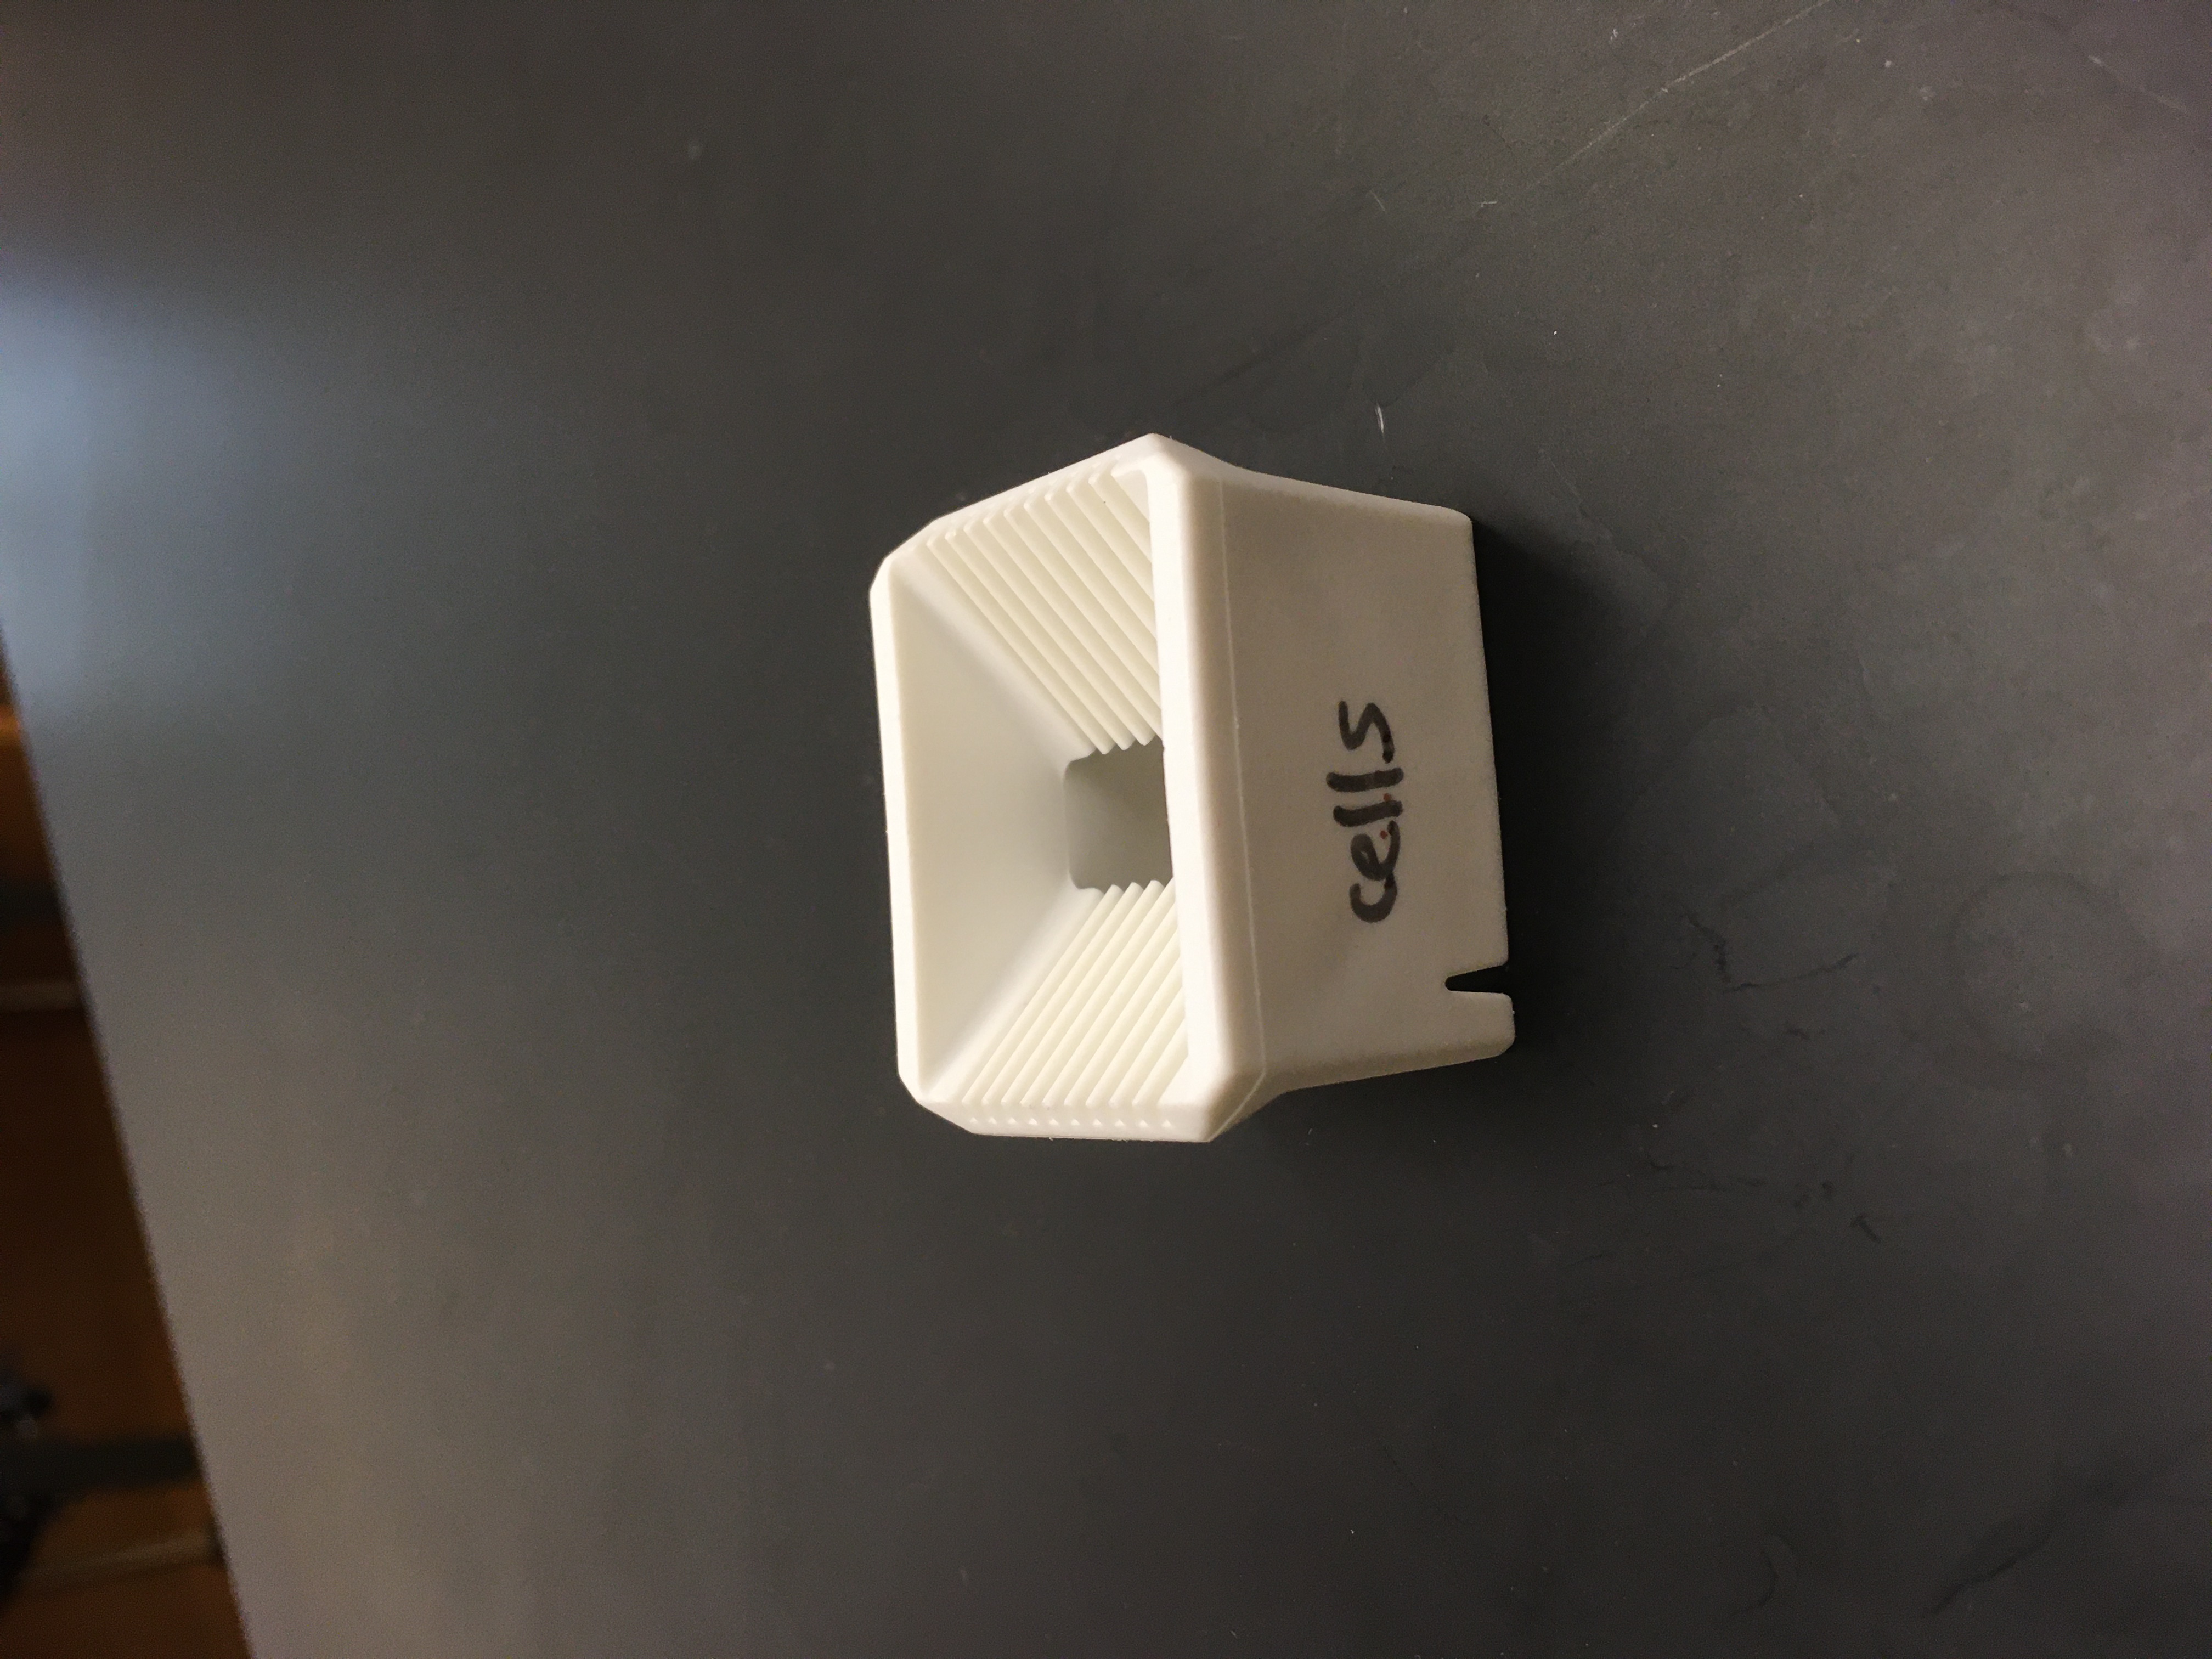
Remove coverslips using a fine-tipped forceps when desired cell density is reached, and put in coverslip rack, cell side facing "cells" label on holder.

Put holder in 100 mL beaker containing ~60 mL PBS with a tiny stir bar. Rinse by stirring for ~5 minutes.
Transfer holder to a second 100 mL beaker containing ~60 mL of fixative. Fix with stirring for ~10 minutes
Transfer holder to a 3rd beaker containing PBS-Tw-Az. Rinse by stirring for ~5 minutes.
Repeat with another beaker of PBS-Tw-Az.
Stain or mount coverslips right away, or store them in the holder in a brown jar with fresh PBS-Tw-Az. They may last up to a month in the refrigerator. Longer than that, they will start to fall off the coverslip.
CO2 Incubator
CO2 Incubator kdorfman Mon, 07/09/2012 - 19:41Thermo Scientific Napco Series 8000 DH
| Room | Model | Serial Number |
|---|---|---|
| 368 | 3584 | 310670-97 |
| 371 | 3598 | 313043-1035 |
1-888-213-1790
- 37C
- 5% CO2
- pan of water in bottom
Thermo Scientific Isotemp Gas Line Filter:
- Fisher 15-497-026 (Thermo Scientific 760210) $176.54/Pack of 10
Thermo Scientific Replacement HEPA Main Filter:
- Fisher 15-497-022 (Thermo Scientific 760175) $60.60 each
- Fisher 15-497-023 (Thermo Scientific 760209) $308.62/Pack of 4
CO2 sensor for model 3598: part # 1900602 (~$400)
Manuals under incubator in 371
Counting cells
Counting cells kdorfman Thu, 09/12/2019 - 16:58Just before plating, after cold medium has been added to the trypsinized cells,
mix 0.1 mL cell suspension with 0.1 mL 0.4% trypan blue. Live cells will not take up trypan blue. (Use a different dilution factor if cells are uncountable)
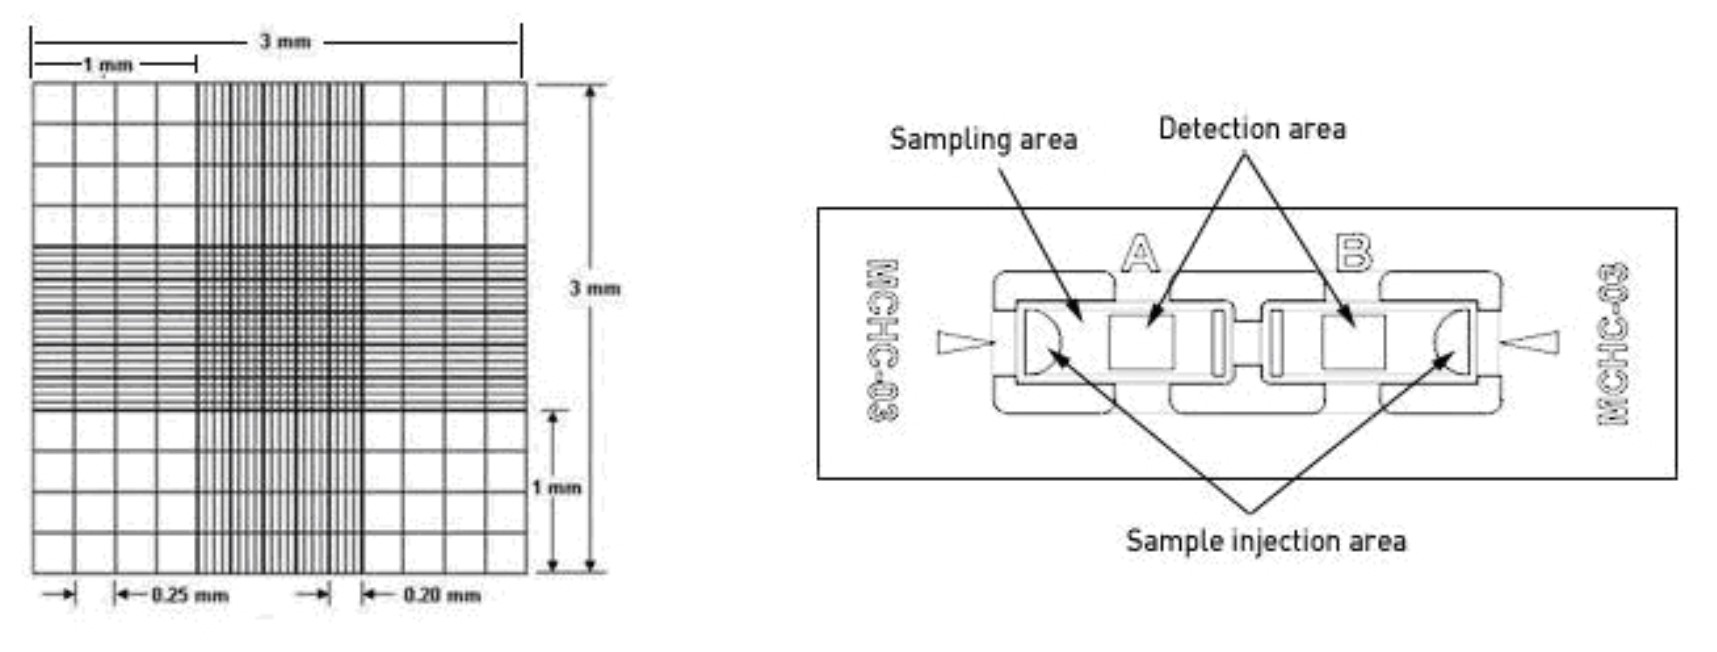
inject 10 uL to one side of the hemocytometer (see image attached below).
Inspect at 10x.
Count the number of live (clear) cells in all 9 squares of the hemocyometer. (Volume = 3mm * 3 mm * 0.1 mm = 0.9 uL) (Count in 4 1mm x 1mm squares if cells are very numerous)
Calculate the live cell concentration (# live cells * 1.11)/1uL for 9 squares,
(# live cells * 2.5/uL for 4 squares)correct for dilution factor
Estimating cell numbers
Estimating cell numbers kdorfman Tue, 08/22/2023 - 17:23From Useful Numbers for Cell culture
(See also counting cells)
| Container | Surface area (cm2) | Seeding density* | Cells at confluency | mL growth medium |
|---|---|---|---|---|
| 35 mm dish | 8.8 | 0.3 x 10⁶ | 1.2 x 10⁶ | 2 |
| 60 mm dish | 21.5 | 0.8 x 10⁶ | 3.2 x 10⁶ | 5 |
| 100 mm dish | 56.7 | 2.2 x 10⁶ | 8.8 x 10⁶ | 12 |
| 150 mm dish | 145 | 5.0 x 10⁶ | 20.0 x 10⁶ | 30 |
| 6-well plate | 9.6 | 0.3 x 10⁶ | 1.2 x 10⁶ | 1 to 3 |
| 12-well plate (~20 mm) | 3.5 | 0.1 x 10⁶ | 0.5 x 10⁶ | 1 to 2 |
| 24-well plate (~15 mm) | 1.9 | 0.05 x 10⁶ | 0.24 x 10⁶ | 0.5 to 1.0 |
| 48-well plate | 1.1 | 0.03 x 10⁶ | 0.12 x 10⁶ | 0.2 to 0.4 |
| 96-well plate | 0.32 | 0.01 106 | 0.04 x 10⁶ | 0.1 to 0.2 |
| T-12.5 flask | 12.5 | 0.35 x 10⁶ | 1.4 x 10⁶ | 1.5-2.5 |
| T-25 flask | 25 | 0.7 x 10⁶ | 2.8 x 10⁶ | 3–5 |
| T-75 flask | 75 | 2.1 x 10⁶ | 8.4 x 10⁶ | 8–15 |
| T-175 flask | 175 | 4.9 x 10⁶ | 23.3 x 10⁶ | 35–53 |
| T-225 flask | 225 | 6.3 x 10⁶ | 30 x 106 | 45–68 |
- Seeding density is given for each culture vessel type as follows:
- Dishes and Flasks: Cells per vessel;
- Culture plates: Cells per well
Hemocytometer Cautions
Hemocytometer Cautions kdorfman Fri, 05/29/2020 - 13:11Use of the Hemacytometer for the Determination of Cell Numbers
Counting cells by the use of a hemacytometer is a convenient and practical method of determining cell numbers in the case that the Coulter counter is out-of-order temporarily. (It is not that bad.) The hemacytometer consists of two chambers, each of which is divided into nine 1.0 mm squares. A cover glass is supported 0.1 mm over these squares so that the total volume over each square is 1.0 mm x 0.1 mm or 0.1 mm3, or 10-4 cm3. Since 1 cm3 is approximately equivalent to 1 ml, the cell concentration per ml will be the average count per square x 104.
Hemacytometer counts are subject to the following sources of error:
- 1. Unequal cell distribution in the sample
- 2. Improper filling of chambers (too much or too little)
- 3. Failure to adopt a convention for counting cells in contact with the boundaries lines or with each other (be consistent)
- 4. Statistical error
With careful attention to detail, the overall error can be reduced to about 15%. It is assumed that the total volume in the chamber represents a random sample. This will not be a valid assumption unless the suspension consists of individual well-separated cells. Cell distribution in the hemacytometer chamber depends on the particle number, not particle mass. Thus, cell clumps will distribute in the same way as single cells and can distort the result. Unless 90% or more of the cells are free from contact with other cells, the count should be repeated with a new sample. A sample will not be representative if the cells are allowed to settle before a sample is taken. Always mix the cell suspension thoroughly before sampling. The cell suspension should be diluted so that each such square has between 20 - 50 cells (2-5 x 10 5 cells/ml). A total of 300 - 400 cells should be counted, since the counting error is approximated by the square root of the total count. A common convention is to count cells that touch the middle lines (of the triple lines) to the left and top of the square, but do not count cells similarly located to the right and bottom. Hemacytometer counts do not distinguish between living and dead cells. A number of stains are useful to make this distinction. Trypan blue among others (Erythrosin B, Nigrosin) can be used: the nuclei of damaged or dead cells take up the stain. If more than 20% of the nuclei are stained, the result is probably significant. Although the trypan stain distinction has been questioned, it is simple and gives a good approximation. See procedure here
References:
From the Laboratory of Dr. Allan Bradley
Baylor College of Medicine, Houston, Texas
Culturing S-cells
Culturing S-cells kdorfman Fri, 05/29/2020 - 15:44Cells are in suspension -- they are not dead!
To make conditioned medium:
- spin cells to bottom of conical tube (be gentle!!).
- Save the supernatant in a labeled tube that has the date and is labeled “conditioned medium”.
- Store extra in fridge.
To grow cells:
- Grow cells at room temperature, no CO2.
Passage every 3-4 days. Dilute cells 1:5 each split and use 20% conditioned medium.
Put cells from flask in tube; spin; take off and save supernatant (this is your conditioned medium!)
- Resuspend pellet (gently) in 5 mL medium.
- Add to clean flask
- 1 mL conditioned medium (supernatant)
- 1 mL cell suspension
- 3 mL fresh medium
- To induce gene expression (e.g, tubulin) add copper sulfate to the medium
- cells are neomycin resistant
- Induce 1 day prior to imaging
- to image put on previously prepared ConA coated coverslips. Image 30 min after plating on Con-A coated dishes or Con-A coated coverslips
To make medium for growth of Drosphila cells:
Schneider's medium + 10% heat-inactivated FCS.
Freezing S2 cells
Spin down a 3-4 day old 75 cm2 confluent flask. 1200 RPM, 5 min
Remove conditioned medium
Resuspend one flask's worth of cell pellet in "freezing medium"
- 1.8 mL fresh medium (including antibiotic and serum)
- 1.8 conditioned
- 400 uL DMSO
Make 1mL aliquots.
Put in -80 in styrofoam for 1 day.
Transfer to liquid nitrogen.
Freezing
Freezing kdorfman Mon, 07/09/2012 - 19:59Approximately 1 freezing vial per 25 cm2 flask.
3 vials from large size (75 cm2) culture flask.
Feeding Cells before freezing
- When cells are 90% confluent (~4 days), replace medium
- Draw out old medium, replace with 5 mL new (warm) medium.
Freezing cells
- Make freezing medium (15% DMSO, 20% serum) in advance
- Remove medium from flask
- Rinse once with ~3 mL sterile PBS. (Squirt in, then suck out.)
- Add 10 – 15 drops trypsin (0.5 – 0.75 mL)
- Incubate (37C) 5 – 30 min
- Add 3 mL cold medium (regular)
- Pour into 15 mL centrifuge tube
- Optional – rinse with another 2 mL, to capture as many cells as possible
- Spin (~100-500xg) 5 – 10 min (until supernate is clear and pellet is hard)
- Pour off supernate (if pellet is solid – otherwise pipette it off)
- Resuspend in 1 mL freezing medium (pipette up and down)
- Transfer to freezing vial (should be slightly more than 1 mL)
- Put on ice
- Store overnight in -80C in "Mr. Frosty" (actually a VWR 414004-284 CryoCooler Freeze Controller)
- Put into liquid nitrogen.
Fill out the freezing log
Nucleofection
Nucleofection kdorfman Tue, 09/25/2012 - 18:08Mirus
Mirus kdorfman Fri, 12/06/2019 - 14:36general summary
100 uL Mirus reagent
2 ug DNA(up to 20 uL DNA solution)
1 - 5 million cells/mL
Lonza Knowledge Center
Protocol
- Warm medium in flask and coverslip-bottom dish
- Mix DNA and Mirus reagent; warm up
- Trypsinize cells:
- remove medium
- rinse with warm PBS
- add 0.5 mL trypsin
- incubate till all cells are in suspension (at least 3 min)
- add 1 mL COLD medium
- mix well by pipetting up and down
- transfer all to sterile 2 mL tube
- spin 500 x g 3 minutes
- resuspend cells in Mirus/DNA solution
- put all into sterile cuvette, close
- Put cuvette into Nucleofector
- Choose program1
- Press the button
- Use special dropper to transfer one drop to the coverslip dish and the rest to the waiting flask.
-
Cell type Program # B16 P-031 3t3 U-030 HCT116 D-032 HeLa I-013 LLCPk-1 X-001 MEF T-020, A-023
Cell Density
Cell Density kdorfman Wed, 09/29/2021 - 16:47selection of nucleofected cells
selection of nucleofected cells kdorfman Thu, 10/03/2019 - 20:47Addgene plasmid selection
Addgene plasmid selection kdorfman Sat, 05/30/2020 - 13:52When cells are medium-light, replace medium with 0.5 g/L G418 (= 0.5 mg/mL)
Next day, replace with medium with 1 g/L (=1 mg/mL)
Next day, 2 g/L (=2 mg/mL)
Solution is 50 mg/mL
Dilute 10 uL per mL to get 0.5 mg/mL
Dilute 20 uL per mL to get 1 mg/mL
Dilute 40 uL/mL to get 2 mg/mL
Making a Stable Cell Line Expressing Your Favorite Gene
Making a Stable Cell Line Expressing Your Favorite Gene margaret Fri, 10/21/2011 - 14:38- Make a death curve. This is to determine the minimal concentration of antibiotic that kills cells that do not have the resistance gene.
- transfect the cells with the plasmid containing the gene that you want to express in the cells (see Amaxa protocol).
- incubate the cells for about 48 hours after transfection so that the gene is expressed, and the resistence gene is expressed.
- add the appropriate dose of antibiotic (this is the selection step). The cells that do not contain the resistance gene (i.e. that were not successfully transfected) will die. Change the medium every 2 or 3 days to remove dead cells. Replace medium with fresh medium containing the antibiotic.
- split the cells as needed. Use medium with antibiotic. Make some coverslips to see if the cells are expressing the gene of interest.
After ~2 weeks any cell without the transgene and selectable marker should have died. The remaining cells are a mixed population – different cells might express different levels of the transgene. These can be used for preliminary experiments.
Making a clonal cell line
- 1. prepare cloning rings by smearing a small amount of grease on one end; make about 10. Have sterile forceps ready; have trypsin ready. Have a 24 well plate ready with some medium in the number of wells that you are planning to use.
- 2. remove medium from dish.
- 3. rinse with PBS--; leave a little bit so the cells don't die.
- 4. tilt the dish to see the colonies; place a cloning ring over nice large and well separated colonies. Press down firmly. Don't let the ring slide around. Add ~100ul of trypsin to each ring; wait a few mins. Pipette cells up and down (in the ring) add the released cells to one well of a 24 well plate. Each well now has a colony of cells – a potential cell line. When they grow, split each well – place some cells in a well of a six well plate to grow some more and put some in a Matek dish – be sure to label carefully so you know which is which. When the cells in the Matek dish are grown – check them in the fluorescence microscope. If they all have the same level of fluorescence and are healthy looking, they are a potential line (which you can further characterize with a Western Blot to quantify the level of expression).
Toss any cell lines that are not healthy or have too much or too little fluorescence.
Lonza Amaxa
Lonza Amaxa kdorfman Fri, 12/06/2019 - 14:34Nucleofection with Lonza Amaxa
Order VCA-1005 Cell Line Nucleofector Kit L (25 reactions $347)
Transfection Protocol
- Warm medium in MatTek dishes to equilibrate CO2
- Warm additional 0.5 mL medium in sterile microfuge tube
- Make mucleofection solution, RT, per flask:
- 19 µL supplement 1
- 81 µL reagent L for LLCPk (Kit R for 3t3, HeLa)
- Remove medium from flask
- Rinse with PBS
- Add trypsin
- Incubate ~5 min, or until cells are floating
- Add cold medium
- Transfer to sterile 15 mL centrifuge tube
- Spin 10 min, slow speed
- Remove medium. Pellet should be soft
- Loosen pellet by flicking tube
- Add all 100 µL nucleofection solution plus the DNA (one of the following):
- 2 µg plasmid DNA
- 5 µg BAC
- 5 µL siRNA (20 µM)
- Pipet up and down to mix
- Transfer to nucleofection cuvette
- Insert into nucleofector device, choose program
- X001 for LLCPK
- I-013 for HeLa
- U-030 for 3t3
- Resuspend cells in 500 µL warm medium
- Distribute in drops on coverslips of MatTek dishes
Plating
Plating kdorfman Mon, 07/09/2012 - 19:50- Put medium into dishes
- MatTek dishes for observations of live cells
- coverslip in a 35 mm dish for fixation and mounting
- Let dishes equilibrate in incubator
- Treat cells in flask with trypsin as for splitting
- Stop trypsinization with cold medium
- Add 1 - 4 drops of medium + cells to each dish, depending on cell density
- Check density of first dish, adjust volume for the remaining dishes
- Check after 24 hours.
Splitting
Splitting kdorfman Mon, 07/09/2012 - 19:44- Put 5 mL medium in each flask. 2.5 ml for mini flasks. Label with cell type and passage number
- Warm flasks in incubator
- Remove medium from cells.
- Right away, Rinse once with ~3 mL sterile PBS. (Squirt gently in, Rock the flask, and then suck out. Do not hit the place where cells are. )
- Add 15 drops sterile trypsin (=~0.75 mL) - enough to cover cells, if more than a thin layer, pull some out
- Incubate (37C) ~5 min or until all floating, likely no more than 5m.
- Check to make sure you can see them floating in the liquid
- Add ~1mL medium to flask, draw up and down to mix.1
- Put back in incubator.
-
Use a ratio of medium: trypsin of 2:1 if you need the cells to hang out longer (say for counting) before going into the new flask. ↩︎
-
if original flask was totally confluent, then use ~1/10th to ~1/5th of the volume; use more if you need cells in a day or two, use less if you don't need cells for a few days. ↩︎
-
For dishes: if you want a nice monolayer of cells to form within one or two days, add a drop or two of cells AND examine in the microscope. You can quickly get a feel for the number of rounded cells and how heavy the plating will be. You can measure the exact volume and keep track if that helps. Remember to rock to distribute cells on the coverslip or Mattek surface (glass bottom dish). Do not swirl. ↩︎
Thawing
Thawing kdorfman Mon, 07/09/2012 - 19:40- Label flask with cell line, passage number, date
- Put 10 mL medium in flask, set in incubator
- Retrieve frozen vial from LN2 dewar, thaw in incubator or water bath.
- Put ~1 mL thawed cells into a single flask
- 24 hours later, replace medium (5 mL)
- Split as needed